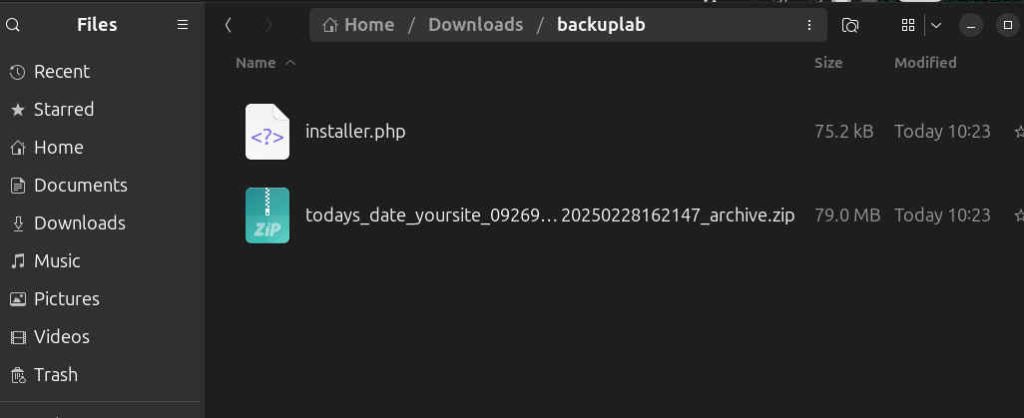
Welcome to this flash course on how to back up your WordPress website. Backing up your site is a life saver when you need it. It saves time and money and I highly recommend you make a backup every time you make important changes to it. English Videos: Video 1 of 2: Install Duplicator and Back up your WordPress Site Video 2 of 2: Restore Your Site Using a Duplicator Backup Videos en Español Video 1/2: Instala Duplicator y Respalda tu Sitio de WP Video 2/2: Restaura tu Sitio con un Respaldo de Duplicator Guide with Pictures: So we\’re starting in our site, lab.witty.computer, for educational purposes. We have a site already up. First we need to go to the wordpress dashboard. Once we\’re in, just go to your left panel and look for plugins, and add a new plugin. Next type \”duplicator\” in the search box, and find this duplicator plugin. Click on Install now. Once that\’s done, activate it. If you want automatic updates, click on allow, or you can skip it. Not very important. Once you have it installed, create a new backup. You can name it whatever you like, I like to name it with today\’s date so I can easily know when the backup is from. Then click Next. There shouldn\’t be any errors, so click \”Build\” and wait for a few minutes while it backs up everything. In large sites this could take maybe up to ten minutes. Once that\’s done, save the installer in a folder you can easily remember. Keeping your files organized always saves time and effort. So I choose this folder, and I need to save both files, the installer and the zip file. I\’m going to change the name to installer.php, I highly recommend this. Then save the zip file. We\’re done here. You now have your site backed up and ready to restore in case something goes wrong! Next, I suggest deleting the backup you just made from the Duplicator Dashboard, since it just takes up unnecessary step. You can skip this if you want. The backup you will need is the one you saved in your hard drive, in case your site crashes. Restoring your Website using a Duplicator backup So you made a mess of your site, but fortunately, you took Witty University\’s advice and have a Duplicator backup of your site.For educational purposes, we\’re going to do everything in lab.witty.computer. We need to start off clean. So we go to our C panel, and delete everything, except my well known folder, because that\’s where I have my SSL. We select everything, and delete from the file manager. Here we can see there\’s nothing there anymore. Since we\’re still in our file manager, we click upload because we\’re going to upload files, and we go to wherever you saved your backup. Here it is. We need to upload both the installer dot php and the zip file. Once that\’s uploaded, we\’re halfway there. We check everything\’s there, and now we need three important steps, first create a database, then create a user, and then link that user to that database. Here it is, don\’t worry, it\’s easier than it sounds. Just go to My SQL databases, in your cpanel.Name your database as you choose. here we\’re going to name it lab restore twenty twenty five, something easy to remember. Next we create a user. I like to have my users and databases have the exact same name, it\’s easier to remember. If you want a very secure password you can use the password generator, just make sure to write it down and save it! Click on create user, and now for the final step, we just need to link that user to that database like this. You select the user, and select the database you want to link and click add. Enable all privileges and click on make changes. Now we go to the file manager again. We saw previously in the file manager that our two files were there, the installer and the zip file. We need to go to our browser and click [yourdomain]/installer.php. We then need to fill the fields with the database and user, as well as the password you wrote down. This takes a few minutes to restore, but once that\’s done, your website will be up and online. But there\’s just one final step left. So we check everything\’s up and running ok,you can reload your browser if you have your url or type it and hit enter. The entire backed up site should appear.There it is, we did it. For the final step you click on the blue Admin Login button log in with your previous logins, or you can go to your wordpress login url. Log in, and the site performs an auto cleanup, and now you\’ve restored your site successfully!